GIF In Photoshop From Rhino Animation
- Jun 13, 2016
- 3 min read
I eventually have time to start to work on my blogs...:D
I actually got inspired from an presentation animation from COBE's proposal on NordHavnen. They ran a very cute animation .What I like most is from about 1'15" to 1'25" - they moved the camera and blended a conceptual white mass model into a colored rendering.
I want to try to do something like that. But this time I am doing a GIF instead of a video.
First things first, I need a model to play with.
So I grabbed an old model I did for a competition. It is an typical floor interior in an office building. I rendered this view before so I already got the materials/lighting ready. I used the Vray for Rhino.

Step 2, yes, how to make a video from Rhino...
I have seen many ways of doing this: I have even seen people writing a python to create a camera ( which I will study soon). But for an easy start, I found a very handy plug-in for Rhino, called "Bongo".

So download from http://bongo.rhino3d.com/.
And Install.
And I got the Plug-in. The interface with Bongo is like this - I got a timeline bar.

Step 3, How to use it?
I am not worried about the miscellaneous functions, as a starter I only focus on basics.
Bongo explains quite very clearly how the timeline works.
Basically the timeline sets up a " timeframe", and I insert some keys to store the location/forms/views of objects. When I play the animation, the timeline slider passes through different keys and the the status of the objects will be showed therefore the scene is animated.


In my case I will only work on the views, the yellow keyframes. Before inserting Keys make sure the I am in the "Open Office View" and in Bongo window the "Open Office" is enabled. It means I am going to animate " Open Office" View.

And click " animate" , the timeline turns red, it means it starts to record the changes of the objects and I can insert Keys.
By move the Time Slider and then rotate the view, a yellow key will appear on the Timeline.
So play around, hit " play " to play the animation and see it is ideal.

Step 4, Export JPEGs. Go to Bongo - Render Animation.
The export window is quite straightforward.
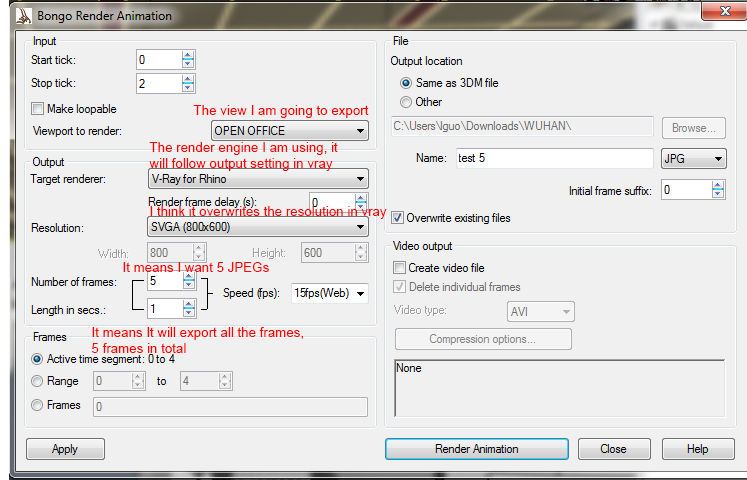
And make the Batch render in Vray Global switches is ticked! Otherwise the Bongo won't work!

Yes I got a bunch of images. In this case I got 5 images.
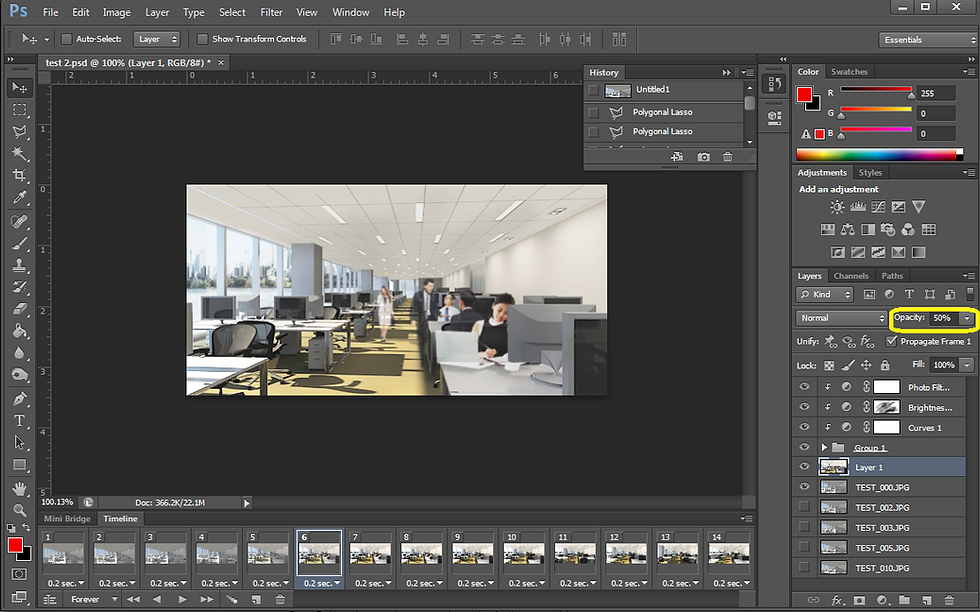
Step 4, Open Photoshop.. Go to File - Scripts - Load File Into Stacks. Choose the files and I got the images loaded into Photoshop and they are separated by different layers automatically.

Choose all the layers and Hit " Create Frame Animations". Then I saw the frames.

Here I can assign how I want each frame lasts. And I can hit play button to see how it looks and etc.
Step 5, Now I am going to work on the fading transition.
It is actually very easy. After I played around I found out it is just some layer transparency.
Here is my understanding, each frame represent certain layer status.
e.g. In frame 3, I only show TEST_003.

In frame 4, I only show TEST_003.

From Frame 5, I start to blend the full colored rendering into the mass rendering, with the colored rendering layer opacity 10%.

Create a new frame and keep going: make the Colored rendering 50% Opacity.
Yea, so I make 2 extra copies and make the colored rendering opacity 75% and 100%. So in frame 8 the Colored rendering is fully shown.

Step 6, Export. Go to File - Save For Web. And here is the settings I used.

And here is the result.
I rendered a few more colored frames and added after the existing GIF so this is how it looks.

Maybe sometime in the future this could be useful...
Luying
6/13/2016


Comments